وب سایت تخصصی شرکت فرین
دسته بندی دوره ها

Make an Open Source Drone

سرفصل های دوره

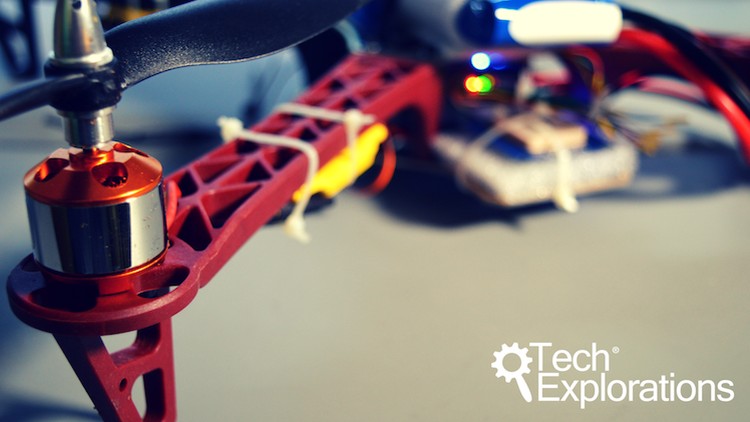
A fun project in which you learn about drones by making one. Use the Pixhawk or Multiwii AIO flight controllers


1. Introduction
  • 1. What is this course about
  • 2.1 List of tools and parts.html
  • 2.2 Make an Open Source Drone - Parts used v2.pdf
  • 2.3 Make an Open Source Drone - Tools used.pdf
  • 2. Parts and Tools.html
  • 3. Crius or Pixhawk Read this before you continue.html

  • 2. Multi-copter drone basics
  • 1. Introduction
  • 2. Another drone classification
  • 3. Types of multi-rotor drones
  • 4. Roll, pitch, yaw
  • 5. Controlling the motors
  • 6. Procuring the right parts
  • 7. Terminology
  • 8. Propellers
  • 9. Battery and charger, Part 1
  • 10. Battery and charger, Part 2
  • 11. Flight controller and its peripherals
  • 12. Other tools and things
  • 13. Conclusion

  • 3. ESC and motors
  • 1. Introduction
  • 2. Preparation
  • 3. Attach the connectors to the ESC wires
  • 4. Attach connectors to motor wires
  • 5. Conclusion

  • 4. Power distribution board assembly
  • 1. Introduction
  • 2. About the power distribution board
  • 3. Solder the ESC power wires
  • 4. Solder the battery wires and connectors
  • 5. Conclusion

  • 5. Main body assembly
  • 1. Introduction
  • 2. Attach the motors to the arms
  • 3. Attach the arms to the power distribution board, Part 1
  • 4. Attach the arms to the power distribution board, Part 2
  • 5. Conclusion

  • 6. Flight controller and peripherals
  • 1. Introduction
  • 2. The PWM and PPM signalling options, Part 1
  • 3. The PWM and PPM signalling options, Part 2
  • 4. Setup radio receiver and flight controller to use PWM
  • 5. Connect the GPS module to the flight controller, Part 1
  • 6. Connect the GPS module to the flight controller, Part 2
  • 7. Connect the GPS module to the flight controller, Part 3
  • 8. Connect the GPS module to the flight controller, Part 4
  • 9. Attach flight controller to chassis
  • 10. Connect ESCs to flight controller
  • 11. Conclusion

  • 7. Battery and charger
  • 1. Introduction
  • 2. A primer on batteries
  • 3. How to charge the battery
  • 4. Attach the battery to the frame
  • 5. Conclusion

  • 8. The firmware
  • 1. Introduction
  • 2.1 EEPROM clear.zip
  • 2. Clear the EEPROM
  • 3. Download and install the firmware
  • 4. Conclusion

  • 9. The transmitter
  • 1. Introduction
  • 2. Binding receiver and transmitter
  • 3. Understand the transmitter basic operations
  • 4. Conclusion

  • 10. Mission Planner
  • 1. Introduction
  • 2. Download and install Mission Planner
  • 3. Mission Planner setup, Part 1
  • 4. Mission Planner setup, Part 2
  • 5. Test the GPS module
  • 6. Conclusion

  • 11. Getting ready to fly
  • 1. Introduction
  • 2.1 Make an Open Source Drone - ESC calibration process.pdf
  • 2. Calibrate the ESCs
  • 3. Attach the propellers
  • 4. Safety and legal issues
  • 5. Conclusion

  • 12. Test flight!
  • 1. Introduction
  • 2.1 Make an Open Source Drone - Preflight Check.pdf
  • 2. Pre-flight checks
  • 3. The first flight
  • 4. Conclusion

  • 13. An upgrade using the Pixhawk flight controller
  • 1. 800 - Section introduction
  • 2. 810 - Why upgrade- The Pixhawk flight controller
  • 3. 820 - Disassembly
  • 4. 830 - A review of the upgrade components
  • 5. 840a - Assembly Part 1 - Propellers
  • 6. 840b - Assembly Part 2 - ESC red wire insulation
  • 7. 840c - Assembly Part 3 - Pixhawk base
  • 8. 840d - Assembly Part 4 - GPS antenna
  • 9. 840e - Assembly Part 5 - Pixhawk assembly
  • 10. 840f - Assembly Part 6 - Buzzer, safety button, power module
  • 11. 840g - Assembly Part 7 - Wirings
  • 12. 840i - Battery and power connections
  • 13. 840h - Verify wiring in Mission Planner
  • 14. 850 - Attach the propellers
  • 15. 855 - ESC calibration with the Pixhawk and safety switch
  • 16. 860 - Calibration and test flight

  • 14. An upgrade using the MATEK F405TE flight controller
  • 1. Objectives of this upgrade
  • 2. The MATEK F405TE flight controller an introduction
  • 3. Disassemble the Pixhawk drone
  • 4. Prepare for the assembly what youll need
  • 5. Soldering of wires and connectors
  • 6. Assembly Part 1
  • 7. Assembly Part 2
  • 8. Assembly - Extended version
  • 9. Wiring verification and first boot
  • 10. Upload Ardupilot firmware to the MATEK f405TE
  • 11. Pre-flight calibration with Mission Planner
  • 12. Calibration for new EMC and motors
  • 13. Pre-flight modifications
  • 14. Test flight

  • 15. Conclusion
  • 1. Whats next
  • 2. Bonus Lecture.html
  • 45,900 تومان
    بیش از یک محصول به صورت دانلودی میخواهید؟ محصول را به سبد خرید اضافه کنید.
    خرید دانلودی فوری

    در این روش نیاز به افزودن محصول به سبد خرید و تکمیل اطلاعات نیست و شما پس از وارد کردن ایمیل خود و طی کردن مراحل پرداخت لینک های دریافت محصولات را در ایمیل خود دریافت خواهید کرد.

    ایمیل شما:
    تولید کننده:
    شناسه: 34217
    حجم: 9273 مگابایت
    مدت زمان: 677 دقیقه
    تاریخ انتشار: 29 فروردین 1403
    دسته بندی محصول
    طراحی سایت و خدمات سئو

    45,900 تومان
    افزودن به سبد خرید