وب سایت تخصصی شرکت فرین
دسته بندی دوره ها

Raspberry Pi Full Stack Upgrade Project

سرفصل های دوره

A challenging upgrade project that blends Raspberry Pi, ESP32, sensors, displays, radio communications & Cloud services.


1. 01 - Introduction
  • 1.1 This courses hardware specifications and requirements.html
  • 1. 01.10 - What is this course about
  • 2.1 A full list of the required hardware.html
  • 2. 01.20 - Parts you will need
  • 3.1 The course repository hosted on GitHub.html
  • 3. 01.30 - Code repository
  • 4. 01.40 - Application demonstration

  • 2. 02 - The new boards
  • 1.1 Arduino boards (arduino.cc).html
  • 1.2 Espressif development boards (espressif.com).html
  • 1.3 Raspberry Pi 4 Model B specifications (RaspberryPi.com).html
  • 1.4 Raspberry Pi Zero 2 W (RaspberryPi.org).html
  • 1. 02.10 - Raspberry Pi Zero 2 W review
  • 2.1 Raspberry Pi imager utility from RaspberryPi.com.html
  • 2. 02.20 - Raspberry Pi OS installation
  • 3. 02.30 - Raspberry Pi OS preparation
  • 4.1 Arduino boards (arduino.cc).html
  • 4.2 ESP32-DevKitC (espressif.com).html
  • 4. 02.40 - ESP32 review
  • 5.1 Arduino IDE download (arduino.cc).html
  • 5.2 ESP32 Installing using the Arduino IDE (espressif-docs).html
  • 5. 02.50 - ESP32 and Arduino IDE

  • 3. 03 - Replace the DHT22 with the BME280
  • 1.1 BME280 datasheet.html
  • 1.2 BME280 product page.html
  • 1.3 DHT22 datasheet.html
  • 1. 03.05 - BME280 basics and why replace the DHT22
  • 2.1 Get this schematic (Github).html
  • 2.2 The Raspberry Pi 40-pin header diagram (RaspberryPi.com documentation).html
  • 2. 03.10 - Raspberry Pi - wiring
  • 3.1 BME280 Python module by rm-hull (Github).html
  • 3. 03.20 - Raspberry Pi - BME280 Python module and example
  • 4.1 Arduino library by finitespace (Github).html
  • 4. 03.30 - ESP32 - BME280 wiring
  • 5.1 See the original on Github.html
  • 5.2 This sketch is one of the examples of the bme280 library by rm-hull.html
  • 5. 03.40 - ESP32 - BME280 library and example sketch

  • 4. 04 - Add the OLED display
  • 1.1 The datasheet for the display.html
  • 1. 04.05 - OLED SSD1306 basics
  • 2.1 Get the schematic from Github.html
  • 2. 04.10 - Raspberry Pi - wiring
  • 3.1 Adafruit SSD1306 Python module.html
  • 3.2 Module on Github.html
  • 3.3 Pillow (PIL) Python module for graphics.html
  • 3. 04.20 - Raspberry Pi - Python modules and setup
  • 4.1 Example hello world program on Github.html
  • 4. 04.30 - Raspberry Pi - example code
  • 5.1 Example hello world program with custom font script on Github.html
  • 5.2 Example hello world program with custom font, font file.html
  • 5. 04.40 - How to install and use custom fonts and sizes

  • 5. 05 - Replace the RF24 with the HC12
  • 1. 05.05 - Introduction to the HC12 and why replace the nRF24
  • 2.1 Wiring schematic on Github.html
  • 2. 05.10 - ESP32 - wiring
  • 3.1 esp-idf note about GPIO12.html
  • 3.2 ESP32 Software Serial library.html
  • 3.3 HC12 Datasheet.html
  • 3.4 Receiver sketch on Github.html
  • 3.5 Serial.write() documentation.html
  • 3.6 Transmitter sketch on Github.html
  • 3.7 utoa() function.html
  • 3. 05.20 - ESP32 example sketch and testing
  • 4.1 Wiring schematic on Github.html
  • 4. 05.30 - Raspberry Pi - wiring
  • 5.1 Learn about the UART port on the Raspberry Pi 4.html
  • 5.2 Python decode() and codecs.html
  • 5.3 Python example receiver script on GitHub.html
  • 5.4 Python readline().html
  • 5.5 Python replace().html
  • 5.6 Python Serial().html
  • 5.7 Raspberry Pi documentation.html
  • 5.8 Raspberry Pi UART.html
  • 5. 05.40 - Raspberry Pi - UART setup and example code
  • 6. 05.50 - ESP32 & RPi communication via HC12
  • 7.1 AT command set in the documentation.html
  • 7. 05.60 - HC12 configuration with AT commands

  • 6. 06 - Assemble the new hardware
  • 1. 06.10 - Objectives of this section
  • 2.1 The circuit for the Raspberry Pi KiCad project on Github.html
  • 2. 06.20 - Raspberry Pi - Wiring
  • 3.1 Learn more about add_event_detect in the GPIO documentation.html
  • 3. 06.30 - Raspberry Pi wiring test
  • 4. 06.40 - ESP32 - wiring
  • 5.1 HC12 sketch (Github).html
  • 5.2 Upload this sketch (from Github) to the ESP32.html
  • 5. 06.50 - ESP32 wiring testing

  • 7. 07 - Restore the original Full Stack application
  • 1. 07.05 - Application restoration - Introduction
  • 2. 07.10 - Install required system modules
  • 3.1 Latest available version of Python 3.html
  • 3. 07.20 - Download, compile and install Python 3
  • 4. 07.30 - Setup the app Python Virtual Environment
  • 5. 07.40 - Setup Nginx
  • 6. 07.50 - Setup Flask
  • 7. 07.60 - UWSGI installation
  • 8. 07.70 - Nginx configuration
  • 9. 07.80 - UWSGI configuration
  • 10. 07.90 - UWSGI and Nginx configuration testing
  • 11. 07.100 - Configure systemd to auto-start uwsgi
  • 12.1 Copy my original Full Stack application files to your new Raspberry Pi (Github).html
  • 12.2 Cyberduck.html
  • 12. 07.110 - Copy the original application files

  • 8. 08 - Testing and fixing
  • 1. 08.05 - Introduction and plan
  • 2. 08.10 - Configure uWSGI to work with the FS app
  • 3. 08.20 - Setup SQLite3
  • 4. 08.30 - Install required Python modules
  • 5. 08.40 - Restore lab_app.py Part 1 Python modules
  • 6.1 Original Code of lab_app.py available on GitHub.html
  • 6. 08.41 - Restore lab_app.py Part 2 Fix lab_temp route
  • 7.1 lab_app.py original code (GitHub).html
  • 7.2 lab_app.py restored code (GitHub).html
  • 7. 08.45 - Restore main flask application script Part 3 Fix lab_env_db route
  • 8.1 env_log.py original code on GitHub.html
  • 8.2 env_log.py restored code on GitHub.html
  • 8. 08.50 - Restore logger script env_log.py
  • 9.1 Get your API key from Plotly Chart Studio.html
  • 9.2 Your Plotly account username and API key.html
  • 9. 08.60 - Plotly
  • 10.1 Your Google account credentials.html
  • 10. 08.70 - Google Sheet logger
  • 11.1 Transmitter sketch on Github.html
  • 11. 08.80 - Remote node receiver script hc12_receiver.py Part 1 - ESP32
  • 12.1 Updated script (intermediate) on Github.html
  • 12. 08.85 - Remote node receiver script hc12_receiver.py Part 2 - Raspberry Pi
  • 13. 08.90 - Remote node receiver service
  • 14.1 Completed script (Github).html
  • 14. 08.100 - IFTTT
  • 15. 08.110 - Full test

  • 9. 09 - New features
  • 1. 09.05 - Introduction and plan
  • 2.1 env_log.py script (Github).html
  • 2. 09.10 - Capture barometric pressure - local
  • 3.1 The completed script (Github).html
  • 3. 09.15 - Capture barometric pressure - remote
  • 4.1 lab_app.py code (Github).html
  • 4.2 The updated templateslab_temp.html (Github).html
  • 4. 09.20 - Show current local barometric pressure
  • 5.1 lab_app.py.html
  • 5.2 lab_env_db.html.html
  • 5. 09.25 - Show historical barometric pressure
  • 6.1 Plotly documentation website.html
  • 6.2 Plotly Python module (latest version).html
  • 6.3 Plotlys Graph Objects.html
  • 6. 09.30 Upgrade Plotly Part 1 Setup and the Plotly Graph Object
  • 7.1 Entire lab_env_db.html file (on Github).html
  • 7.2 Entire upgraded lab_app.py file (on Github).html
  • 7. 09.31 Upgrade Plotly Part 2 Upgrade implementation
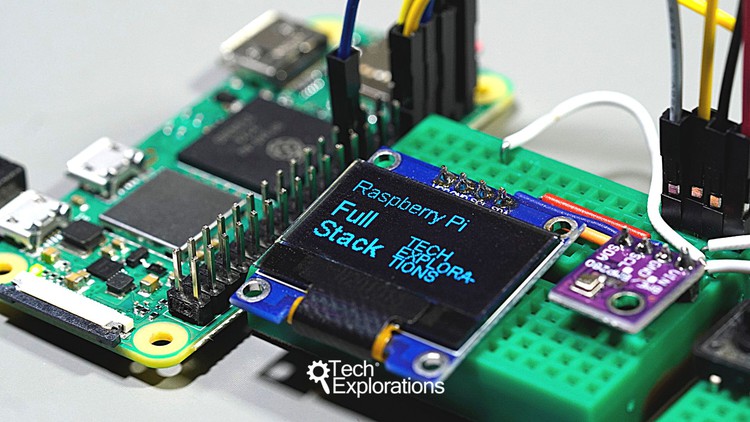
  • 8. 09.40 Show sensor data on OLED Part 1 Plan
  • 9.1 Schedule Python module.html
  • 9.2 The base Python script (GitHub).html
  • 9. 09.41 Show sensor data on OLED Part 2 Setup and base script
  • 10.1 Get the upgraded file oled_mulitfunction_v1.py from Github.html
  • 10.2 Install the ischedule module.html
  • 10. 09.42 Show sensor data on OLED Part 3 Scheduler
  • 11.1 About the Python os module (Python documentation).html
  • 11.2 Copy the oled_multifunction_v2.py from GitHub.html
  • 11.3 RPiFS4 - 09.050 - Show SD available space on OLED (button press)
  • 11. 09.50 - Show SD available space on OLED (button press)
  • 12.1 Systemd configuration file (Github).html
  • 12. 09.60 - OLED display as a service
  • 13.1 Download the KiCad project from Github.html
  • 13. 09.70 - New PCB for the Raspberry Pi
  • 14.1 Download the KiCad project from Github.html
  • 14. 09.80 - New PCB for the ESP32
  • 53,700 تومان
    بیش از یک محصول به صورت دانلودی میخواهید؟ محصول را به سبد خرید اضافه کنید.
    خرید دانلودی فوری

    در این روش نیاز به افزودن محصول به سبد خرید و تکمیل اطلاعات نیست و شما پس از وارد کردن ایمیل خود و طی کردن مراحل پرداخت لینک های دریافت محصولات را در ایمیل خود دریافت خواهید کرد.

    ایمیل شما:
    تولید کننده:
    شناسه: 3191
    حجم: 5771 مگابایت
    مدت زمان: 466 دقیقه
    تاریخ انتشار: 29 دی 1401
    طراحی سایت و خدمات سئو

    53,700 تومان
    افزودن به سبد خرید